
Accessibility Checks Anyone Can Do
It takes a specialized skill set to conduct a complete web accessibility evaluation, but there are several things anyone can do to evaluate a website. Below are 6 things you can do without a knowledge of HTML.
Featured Resource
Start by watching this 6-minute video demonstrating these evaluation steps. Then use the details below to try it yourself.
1. Use the Wave Tool To Detect Errors
WAVE is a free online tool that uses color-coded icons to help you identify accessibility issues as well as potential issues and features. To use WAVE, enter your website address. WAVE will evaluate the page and annotate it with numerous icons. Much of the information presented in WAVE (or any other accessibility checker) requires some understanding of HTML, something many of us do not possess. If you are not familiar with HTML, just focus on the red “error” icons. These are issues that WAVE knows cause accessibility issues. If you are not sure what an icon means, click on it and then select More information.
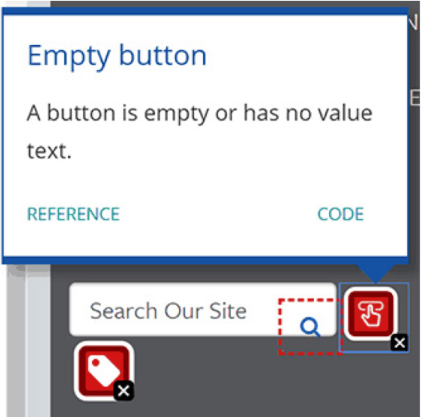
WAVE will provide details on what the issue is, why it matters, and what you can do about it.
If you cannot see some of the error icons in the page, select the No Styles button to view the page without styles. Although the page will look different, all icons should be visible. You can also click on the Contrast button to identify text with low contrast that may be difficult for some people to read.
Remember that the red errors are probably not the only issues within the page, and the absence of red errors does not mean there are no problems. Use the presence of errors as an indicator for whether or not the developer had accessibility in mind as they developed the page.
2. Navigate Without a Mouse
Navigating your website only with a keyboard is a straightforward way to make sure everything on your website is accessible to someone who cannot operate a mouse or touchscreen.
- Tab: Navigate to links and form controls.
- Shift + Tab: Navigate backwards.
- Enter: Activate links and buttons.
- Spacebar: Activate checkboxes and buttons.
- Arrow keys: Radio buttons, select/dropdown menus, sliders, tab panels, autocomplete, tree menus, etc.
- Esc: Close popups
As you move around the page with a keyboard, there should always be a clear outline that shows where you are. The order that you move around the page should make sense, and you should not become trapped inside anything. You may also need to use your mouse to make sure there aren’t any features that you are missing because they are hidden from someone using a keyboard, like a navigation menu that expands when you hover over it with a mouse.
Did
You
Know
If you are a Mac user, you may first need to change some settings before you can fully navigate web content via your keyboard. Go to System Preferences > Keyboard > Shortcuts. Choose the “All controls” option at the bottom of the window.

3. Zoom the Web Page
Some users with visual disabilities enlarge page content for readability, but enlarging content on a page can sometimes cause layout problems. To make everything in the page larger, press Ctrl (cmd on Mac) and + (plus) to make content bigger or - (minus) to make it smaller.
Zoom the page several times, at least 200 percent, and preferable up to 400 percent. Make sure everything is readable, especially images with text. You may find the page changes how it looks as you zoom in. For example, the layout changes from two columns to one column, or the menu collapses.
If this happens, you are seeing the webpage as it appears on a mobile device. Called “responsive design,” this is usually a great thing for someone zooming the page. It keeps them from having to constantly scroll the screen side-to-side while reading.
Quick
Tip
If your page changes to a mobile view when you zoom in, test this new view with a keyboard.
4. Check Videos for Captions
Checking a video for the presence of captions is pretty straightforward—captions will either be visible when the video starts playing, or the video player will have a button that reveals the captions. Checking the quality of captions is a more time-consuming task. It requires reviewing the media to make sure the right information is presented at the right time. Some services (most notably YouTube) offer automatically-generated captions that may have numerous errors, and other captions simply are not accurate.
Quick
Tip
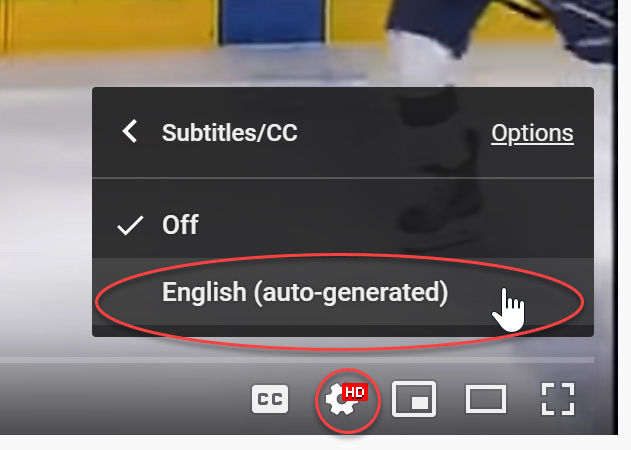
To check for automatically-generated captions in YouTube, first look for the “CC” button (if there is no CC button, the video does not have any closed captions). Then click the Settings icon in the video player, then choose Subtitles/CC. If the only caption track that is available ends with the words “(auto-generated)”, this means YouTube created the captions automatically, and they may not be accurate.
5. Look at the Link
Scan the page visually or use the Tab to review the links in the page. Look for links with generic link text such as “click here” or “more info,” or any other links that do not make sense.
6. Check the Page Title
Check the page title (the text that appears in your browser tab) and make sure that it is unique and descriptive. The name of your organization is a good title for your homepage but not for your “Contact Us” page.
Quick
Tip
Microsoft Office and Adobe Acrobat also have built in Accessibility Checkers.